Cache in Magento 2
Cache management plays a vital role in Store performance and performance optimization. Nowadays, eCommerce technologies allow merchants to add any amount of items for sale. Yet, this vast amount of products may lead to a slower website, adversely impacting the customers' shopping experience and conversion rate.
Hopefully, Magento 2 solves the issue by Full Page Cache. This article will teach you about Magento 2 Cache types, Magento 2 Cache options, Advanced Cache management, complete page cache configuration, and Ways to check cache status.
Let's get into it.
How Does Magento 2 Full Page Cache Work?
Before moving further, do you know what cache is? It is a system location where the frequently accessed data gets stored. Magento takes multiple queries to retrieve data from the database tables. That means the more significant the data, the higher the time spent on the compiling process for the results.
To solve this, Magento uses cache functionality by preventing subsequent server-side requests and leading content faster. Magento 2 Cache is in the cache directory of the root with the settings located at System → Cache Management.
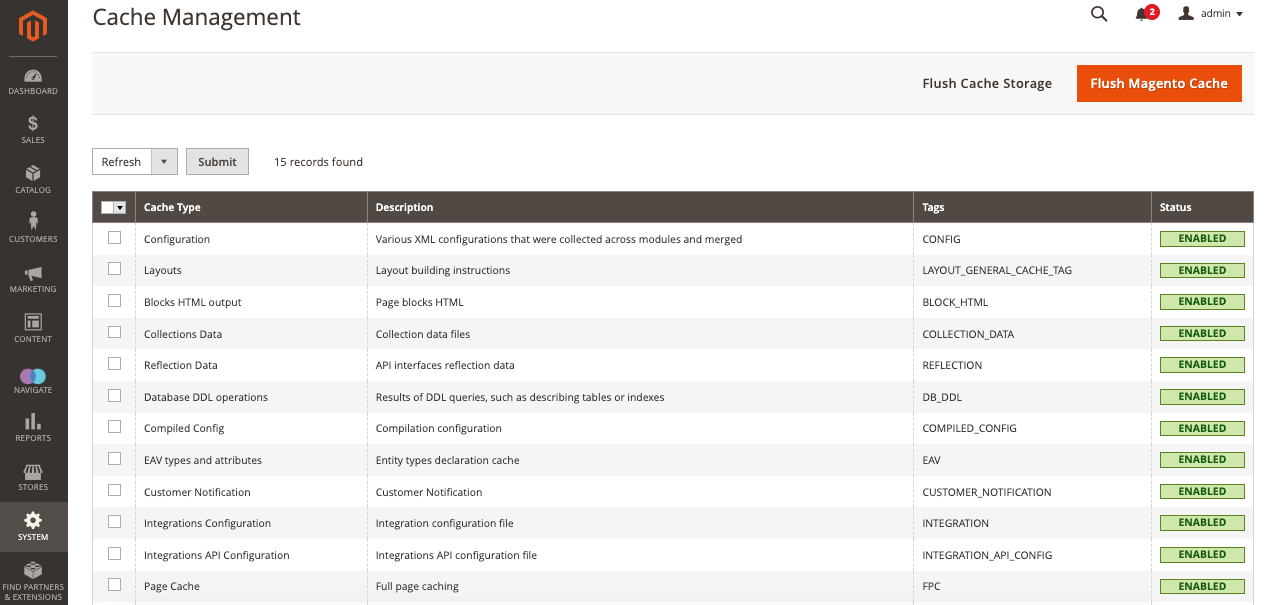
There are 12 default Magento caches, and they are:
-
Configuration: Various XML configuration info from all the modules and stocks are stored here. This setting allows you to manage website-wise and store view cache type.
-
Layouts: As it depicts, layout changes on the page are compiled and stored as a cache; once you are done with implementing the changes, flush this cache.
-
Block HTML Output: This cache is comprised of HTML blocks on the page; make sure to flush it after updates to a store view layer.
-
Collections Data: All the database queries get cleaned automatically by the System.
-
Reflection Data: When running the API interface, the cache gets stored as reflection data, get this cache is flushed.
-
Compiled Config: This is related to code compilation and should be cleared and flushed.
-
Database DDL operations: Resulted from the database queries.
-
Entity attribute value (EAV): EAV attributes such as store labels, site search settings, links to specific blocks of PHP code, and so.
-
Integrations Configuration: Comprise of integration configuration.
-
Integrations API Configuration: It is due to the API integration and configurations.
-
Page Cache: Full page cache should be flushed each time after editing the website HTML structure.
-
Translations: Translation files from any module.
-
Web Services Configuration: REST and SOAP Web API structure of the site, generated as a WSDL file.
Enable Magento 2 Cache
Navigate to System → Cache Management and enable the required cache types from here. Or you can have it enabled through the command line.
to enable specific cache type
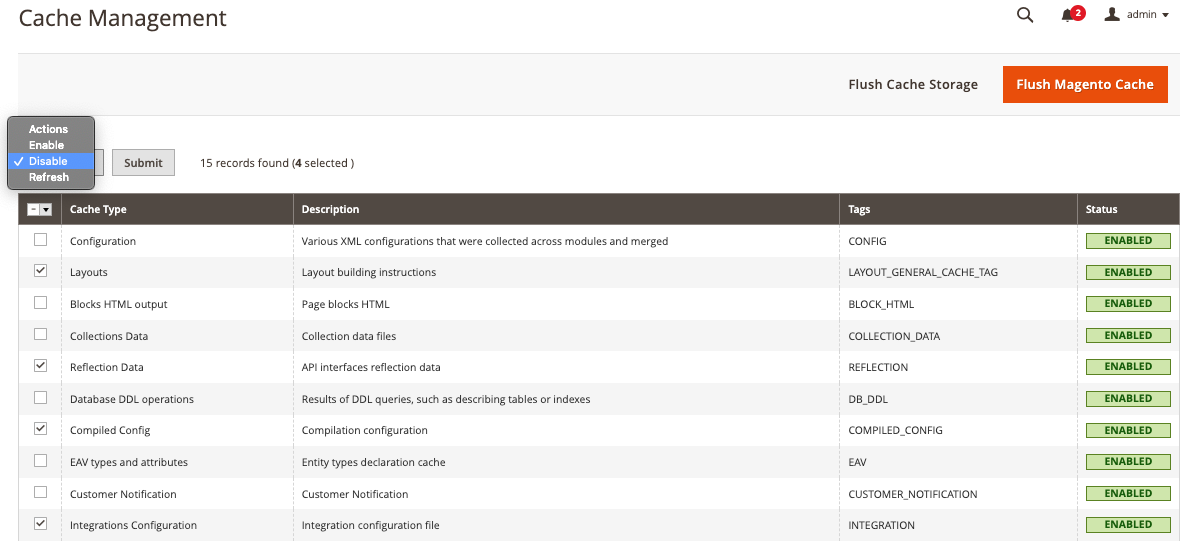
Disable Magento 2 Cache
To disable the caching in Magento 2, follow this option:
Choose all unwanted cache types under System → Cache management
From the left menu, open the Actions drop-down
Choose the 'Disable' option
To ensure a clear cache, click the "Flush Magento Cache" button in the upper-right part of the working area.
On the flip side, you can also disable the caching in Magento 2 from the command lines:
To disable all cache types, enter:
Next enter:
This is to make sure of a cleaned and clear cache.
Advanced Cache Management Options in Magento 2
To have the advanced Configuration for caching, navigate to System → Cache Management. From here, you can perform:
-
Flush Magento Cache: It helps to clear all the default Magento cache located in Var/Cache.
-
Clear Image Cache: Helps to clear watermarked and modified catalog images automatically, located in the media/catalog/product/cache folder.
-
Flush JavaScript/CSS Cache: clear the merged copies of JS and CSS files
-
Remove Cache: Remove all pre-processed view and static files.
Full Page Cache Configuration
If you are looking for How to configure a full-page cache? Please follow the below-mentioned steps:
From the main navigation menu, select "Stores" and go to Configuration → Advanced → System → Full Page Cache Option. To have the changes from the default value, please uncheck "Use System Value."
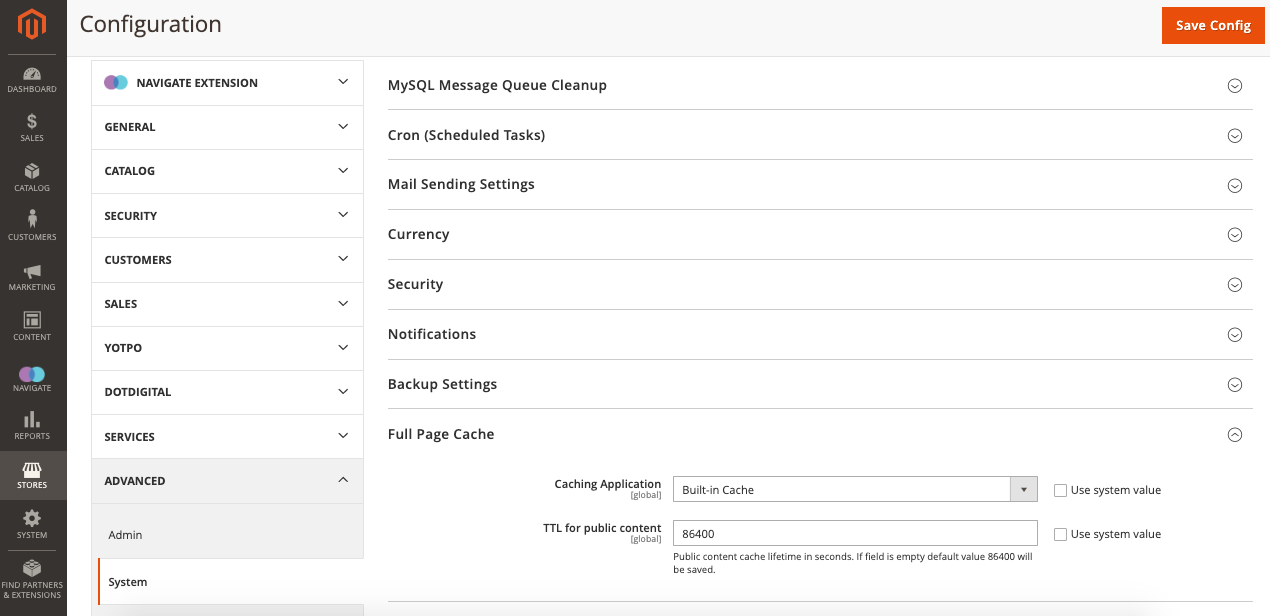
For the "Caching Application" settings, you can opt either:
-
Use a built-in application,
-
Set up Varnish Caching.
You need to define the time-out for the page cache if you are willing to use a built-in app. Natively, the default value is set to 86400. However, you can change it as per your business requirements. If you want to go with "Varnish Cache,” you need to have another setting to configure it, which contains settings for IP access, backend host, and port and a few expanded configuration options.
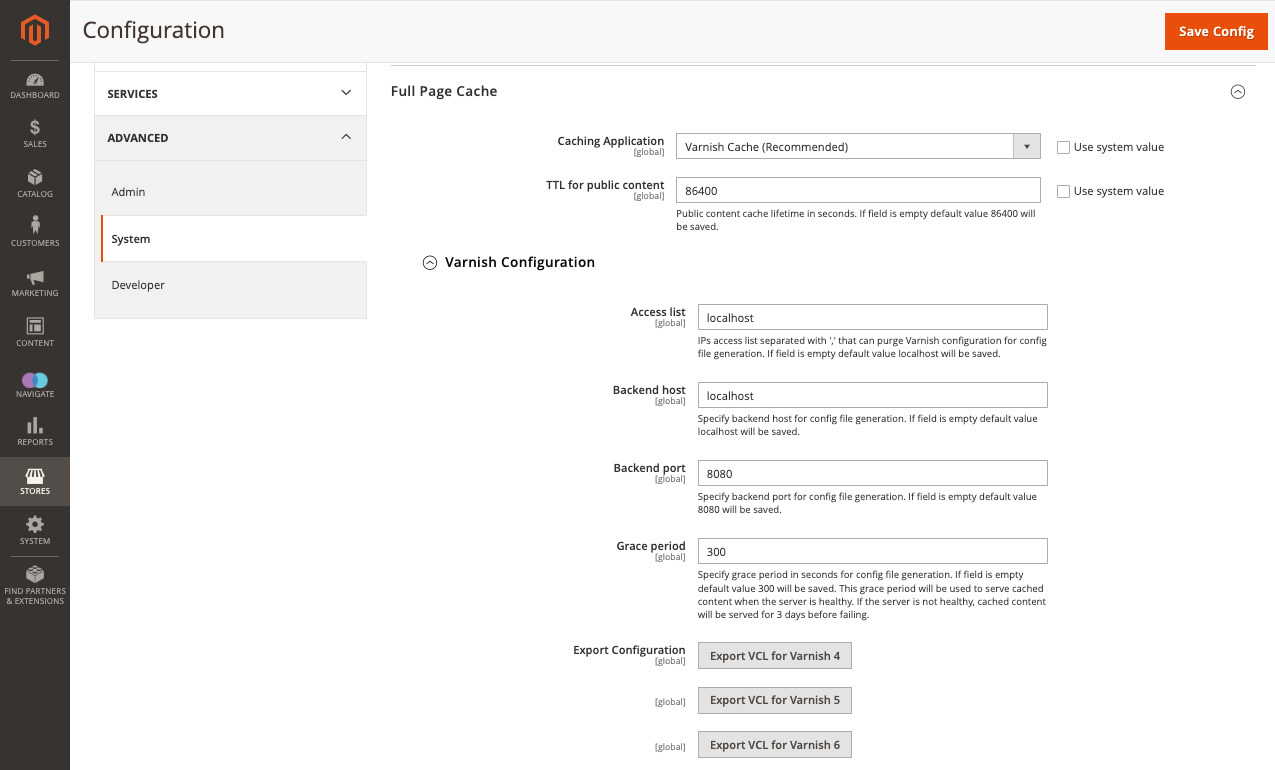
The settings are:
-
Access list: Enter IP addresses that will purge Varnish configuration for the config file generation. If you let this empty, the System sets it to default as “Local Host.”
-
Backend host: Enter the IP address of the backend host responsible for generating Config files. By default, the value is set as “Local Host.”
-
Backend port: Identify the backend port that is used to create the config file.
-
Export Configuration: Specify the Varnish version you use for the cache management.
Cache Status
To see the cache status, follow the command line as given below:
The results will be something like this:
Current status:
That's all!